Portal
Home Blog

My Camelot Pro Setup – 5 Reasons to Harness The Incredible Power of the iPad

0

Embarking on the exhilarating journey of live performances, every musician craves a setup that’s not just reliable but also brimming with the potential to unleash creativity in the spur of the moment. Enter my Camelot Pro setup, the knight in shining armour for my musical performances. In this digital era where the gigs meet (even more) tech, Camelot Pro has emerged as a beacon of innovation, especially for those of us who find ourselves hopping on and off cruise ships, serenading the sea with our tunes.

Imagine having a setup that not only travels with you across the oceans but also ensures your sounds and patches are just a tap away. Sounds like a dream, doesn’t it? Well, Camelot Pro has turned this into reality, offering a seamless experience that rivals, and perhaps even surpasses, the once go-to MainStage with its complex gear requirements. The beauty of Camelot Pro lies in its cross-platform functionality, a feature that resonates with the nomadic lifestyle of musicians like myself.

For years, we’ve tangled with cables, fretted over the compatibility of our gear, and spent countless hours ensuring our setups are just right for the next performance. But what if I told you there’s a way to bypass this gear-heavy ordeal without compromising on the quality of your sound? My Camelot Pro setup does exactly that. It’s not just a setup; it’s my musical companion that ensures consistency, quality, and that spark of creativity, whether I’m performing under the starlit sky on a cruise deck or in the pit of a theatre.

Let me share the details of my Camelot Pro setup, the gear that makes my performances on a range of gigs including cruise ships much easier, and how this incredible platform has revolutionised the way I perform live.

Why Camelot Pro?

As a keyboard player, I’ve been a user of MainStage for many years and for theatre productions has served itself fairly well. Over time though, I’ve found it increasingly lacking in flexibility in the range of contexts I need access to my sounds. Whilst it’s possible to get fairly granular in the manipulation of patches (layers, effects, splits, etc), it’s felt more and more clunky both in terms of the software and it’s hardware too.

Mainstage has felt like a fairly poor relation when it comes to apple software without an obvious product roadmap nor the developers truly understanding the needs of gigging musicians. During the covid lockdown, Audio Modeling hit my radar for their non-sampled, SWAM engine products. Whilst looking at their website I encountered their “Camelot Pro” page and fell into a rabbit hole of YouTube videos watching the wizardry in action!
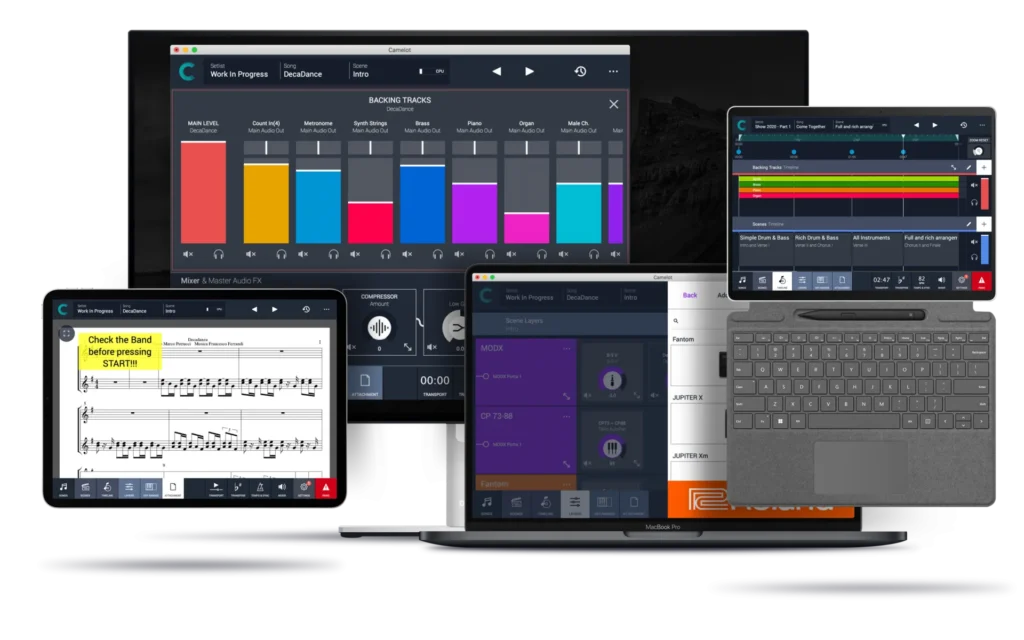
1. Cross-Platform

Unlike MainStage, Camelot Pro is cross-platform and works on a iPad too. The great thing about this approach is the consistency in progamming/operation no watter what device you are using. Whilst Camelot Pro isn’t available for Android devices it is available for iOS, Mac and Windows. But there is a slight caveat to creating and then transferring songs/scenes between these devices.

As Camelot Pro is a (highly advanced) MIDI patchbay, the apps/sample libraries you have on each device may vary, therefore there will be some manual updating of connections to patches, effect generators and the like. That being said, splits, layers will all remain present. This is most obvious when programming on an iPad and using iOS-only apps and sending the file(s) to a MacBook. Increasingly though, many libraries are also available (or at least becoming available) on more than one platform. Pianoteq (modelled pianos etc) are cross platform.

Devices on which Camelot Pro will run including Desktop (PC & Mac), iPad and portable Windows device.

2. Portable Flexibility

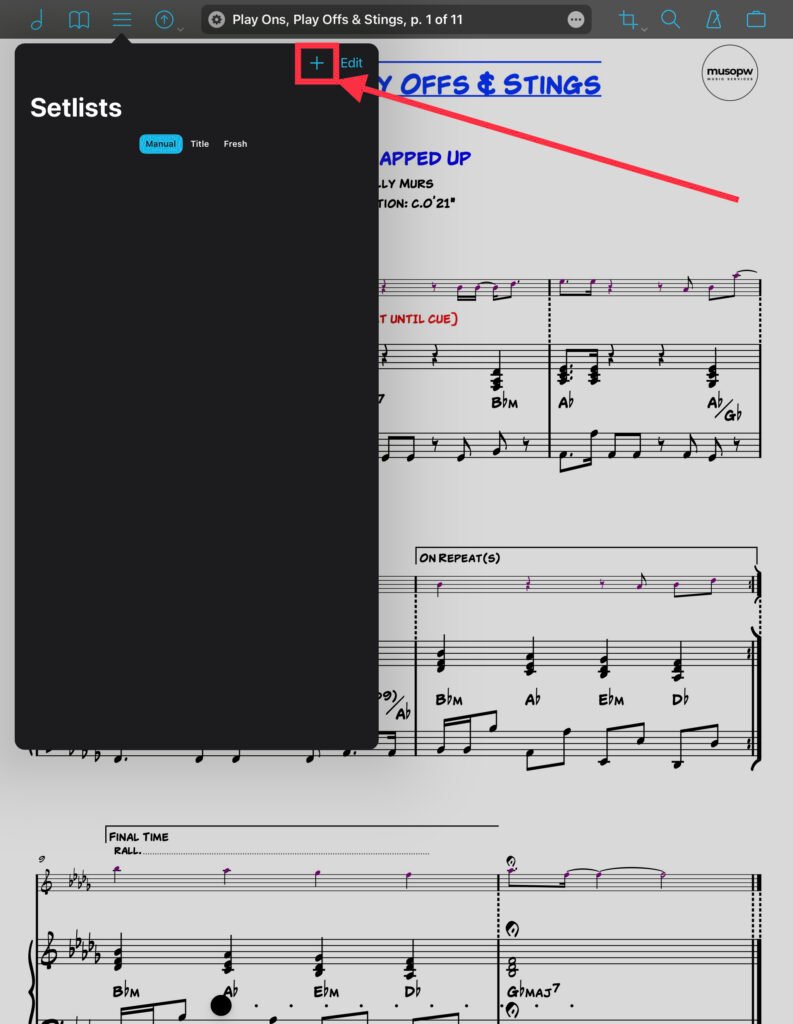
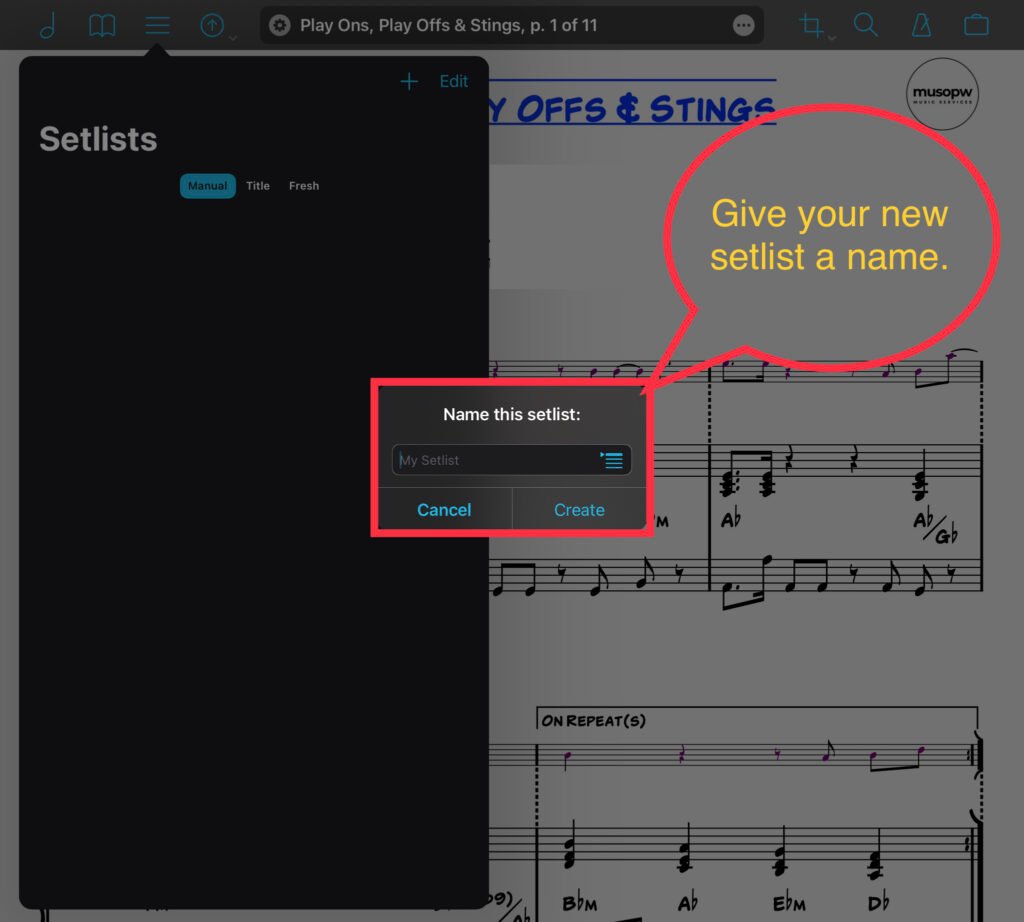
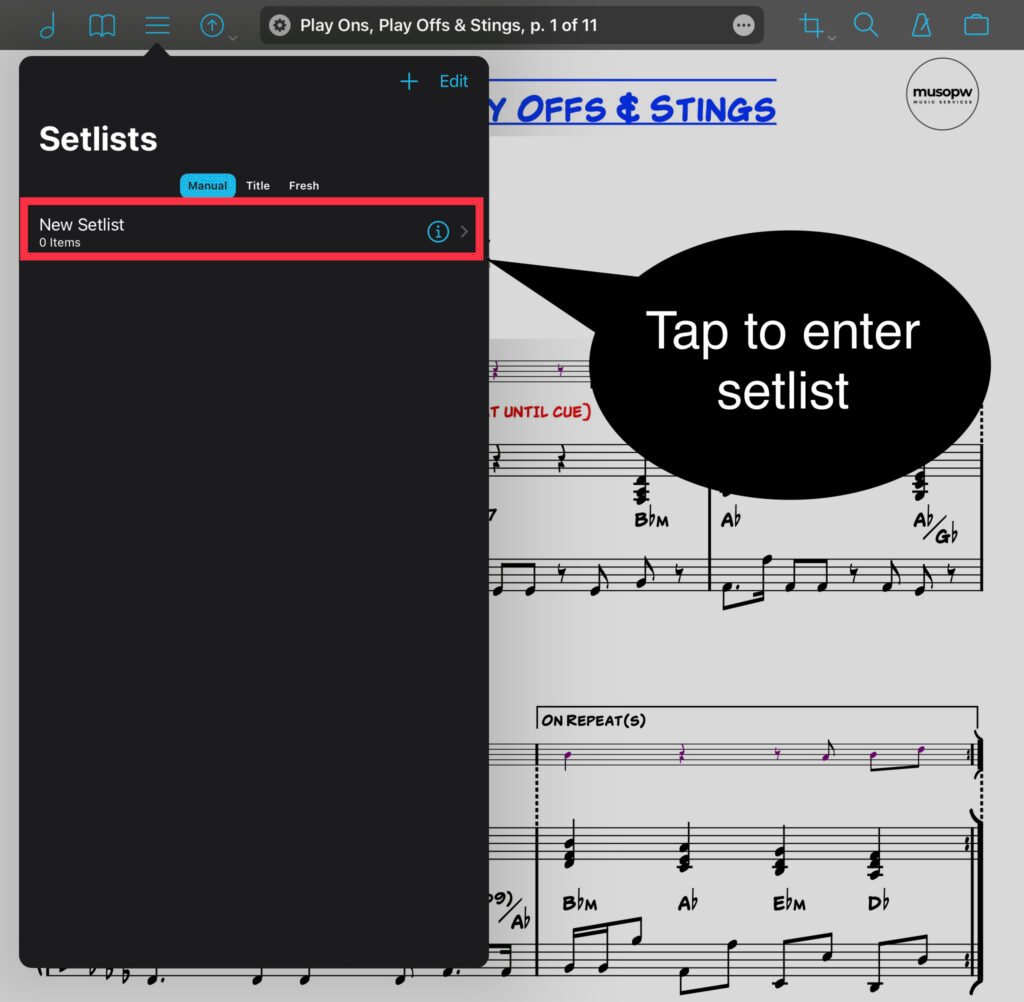
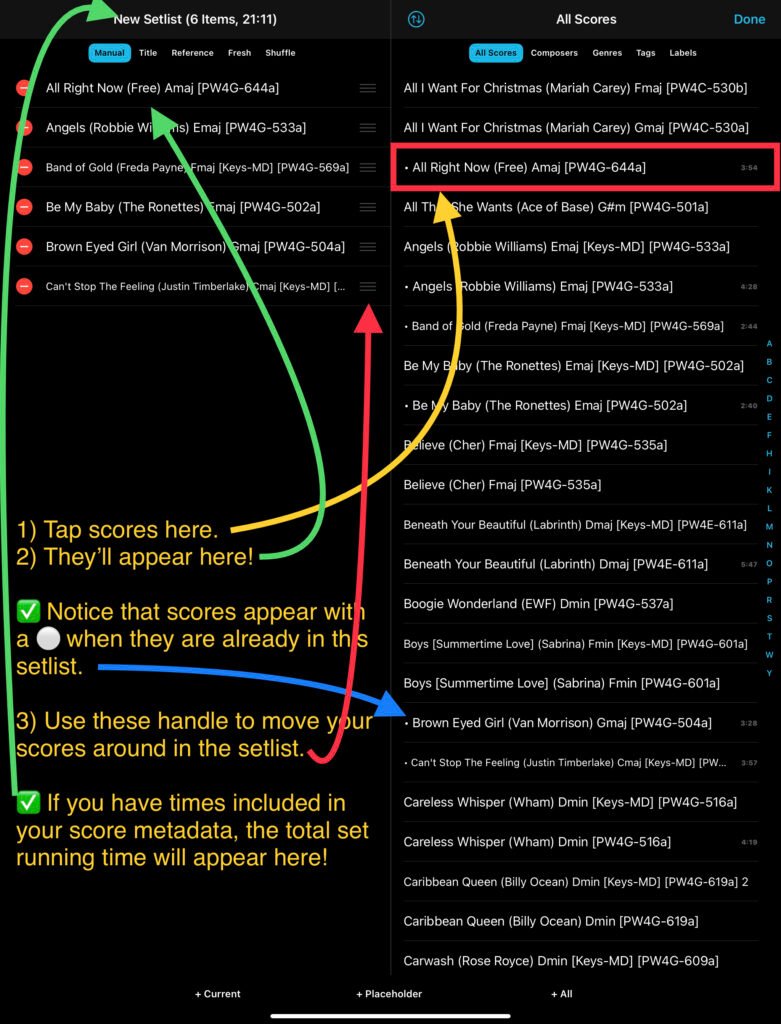
Whilst I do own the desktop version of Camelot, I rarely use it. This isn’t because it is any different from the iOS version – it’s simply that the iPad version is so bloody useful and PORTABLE! I love being able to programme my sounds wherever I am (frequently on train journeys, often backstage!) and building setlists from my existing “songs”. As a keyboard player, Musical Director and in my role at Sonic Artistes, I play in many different contexts and jump into different musical products including party bands with set musical arrangements.

This requires access to sounds quickly and consistently (sometimes fairly complex especially for 80’s music) and many of the ships and indeed venues on ships have different keys/synth setups. Therefore working out how to programme and access patches quickly can cause problems so the most efficient way to run these performances is with my trusted Camelot Pro setup.

3. Multiple Contexts

Whilst the concept of using Camelot Pro on an iPad is impressive in itself, being able to programme Camelot Pro in a musical theatre context using a desktop adds options for different sample libraries, more complex audio routing (although this is still achievable with an iPad!) and potentially a more permanent setup such as West End or touring productions. The great thing about this is that the interface is the same, not requiring a period adjustment to learn new software on a different device. That being said, I’ve used my iPad on theatre productions and it was unwavering on its reliability, robustness, particularly on 3-show panto days!

4. Control

For me, being able to layer and split is a crucial part of my programming and Camelot Pro has this functionality in spades. As with any software there is always a learning curve but I genuinely believe if you’ve used MainStage or any kind of DAW in the past, you’ll take to it like a duck to water. For me, Camelot Pro makes sense and the interfacing is logical and obvious. I love being able to layer choose regions where the sounds occur, all at the touch/drag of a finger – something I found somewhat time consuming using a desktop.

Alongside software instruments (which I use exclusively on my iPad), you can also control MIDI devices with an insane number of pre-progammed/listed devices called smart maps, check them out here. If you have compression tools, effects processors then you can easily integrate these into your Camelot Pro setup. This coupled with an solid audio interface will give you the ultimate control over sound design.

5. Toolbox of Goodies

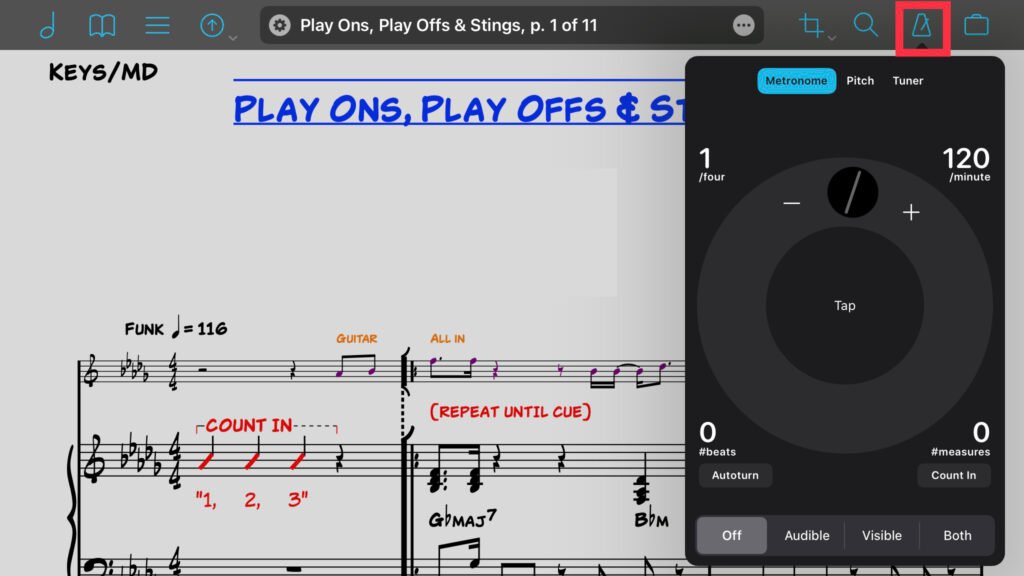
Alongside the incredible power of programming for keyboard players (and not just keyboard players…..check this out guitarists!), Camelot has some other truly outstanding features such as track (and multi-track) playback. This is great (and highly reliable) for running click tracks/stems etc. Not only this but whilst running tracks, Camelot Pro will automatically switch scenes (change patches) at hitpoints you programme. A complete game-changer. 

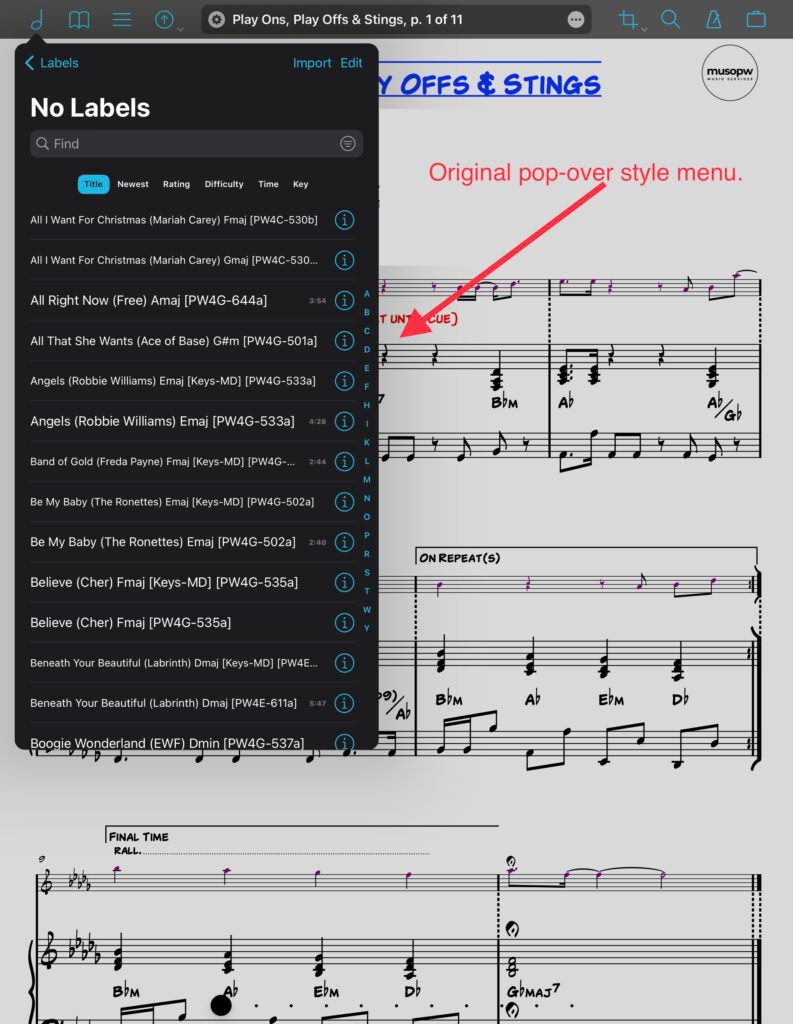
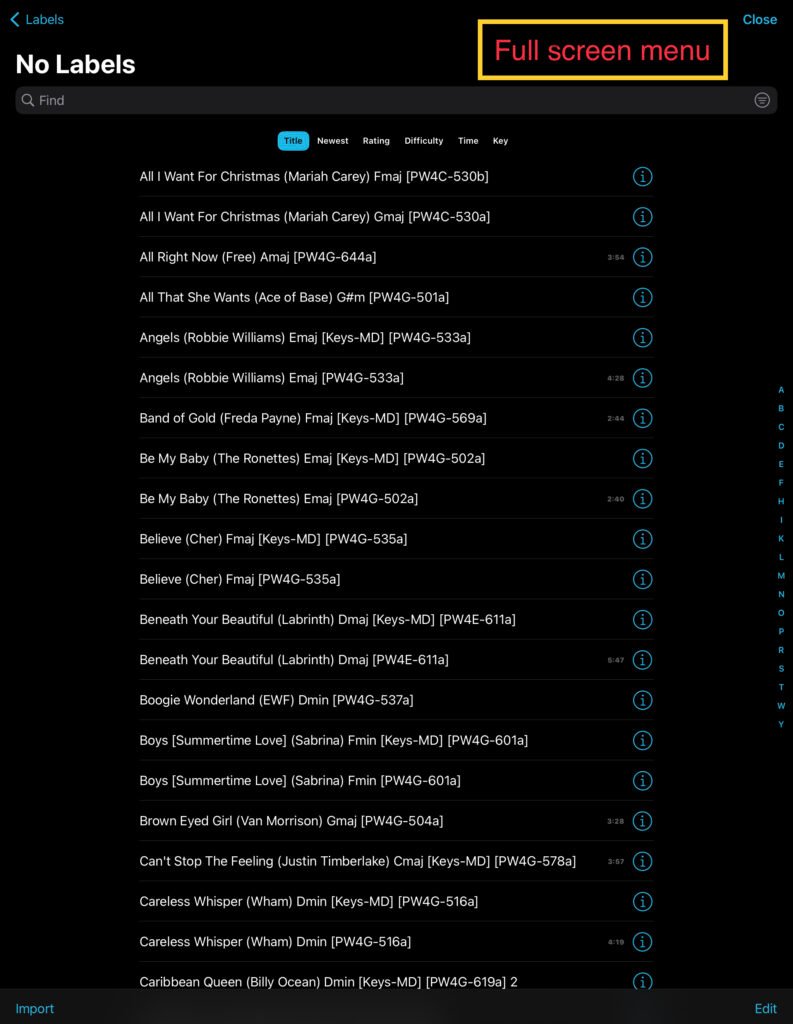
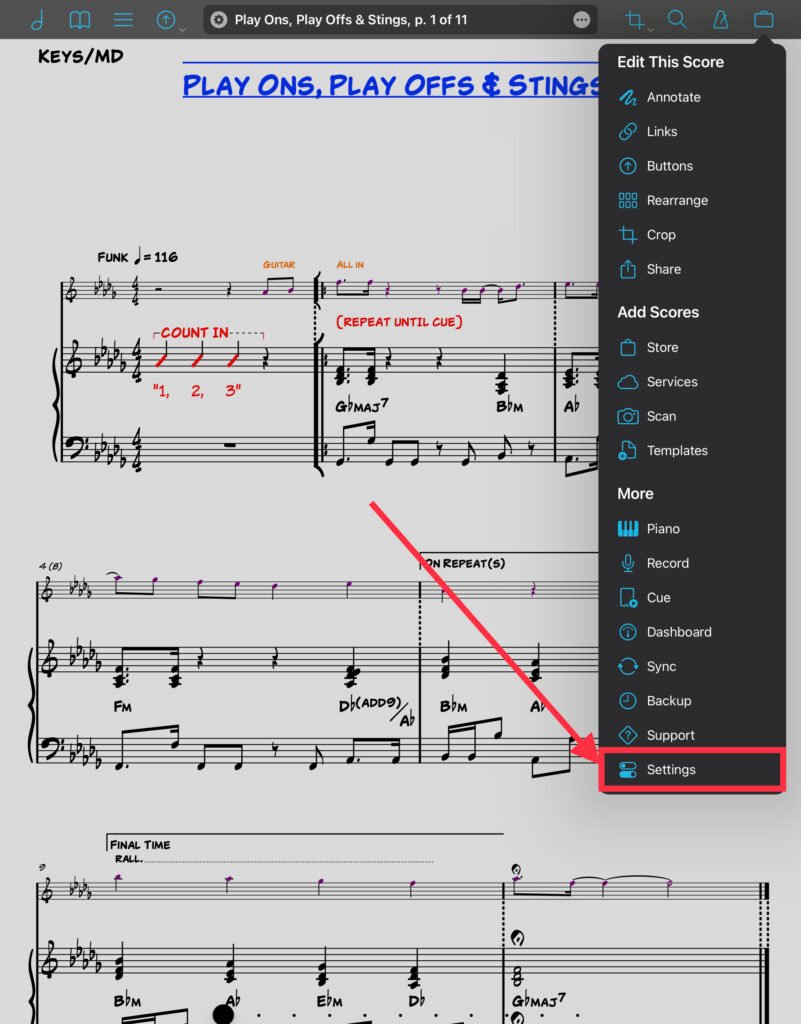
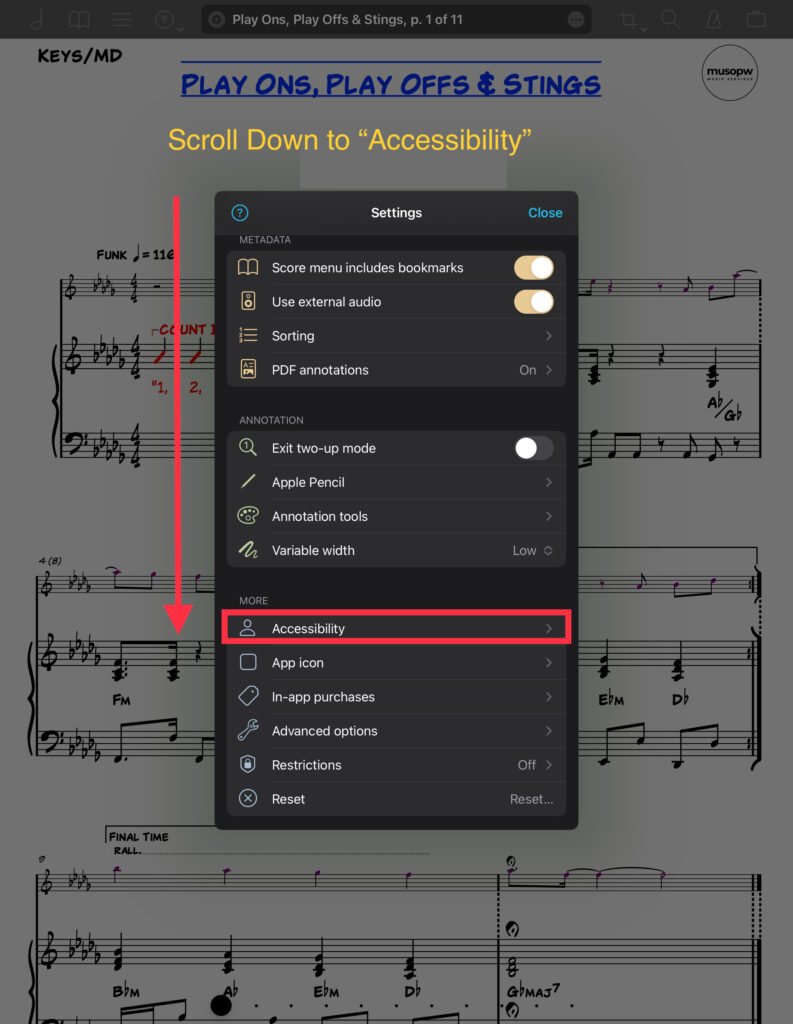
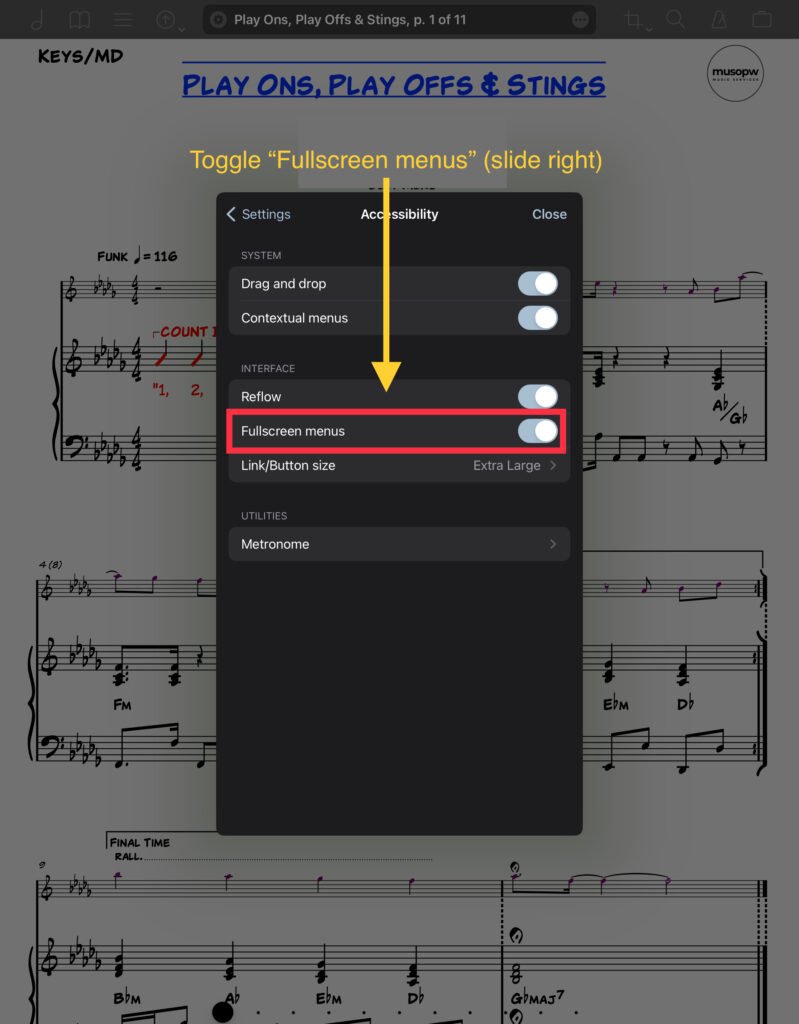
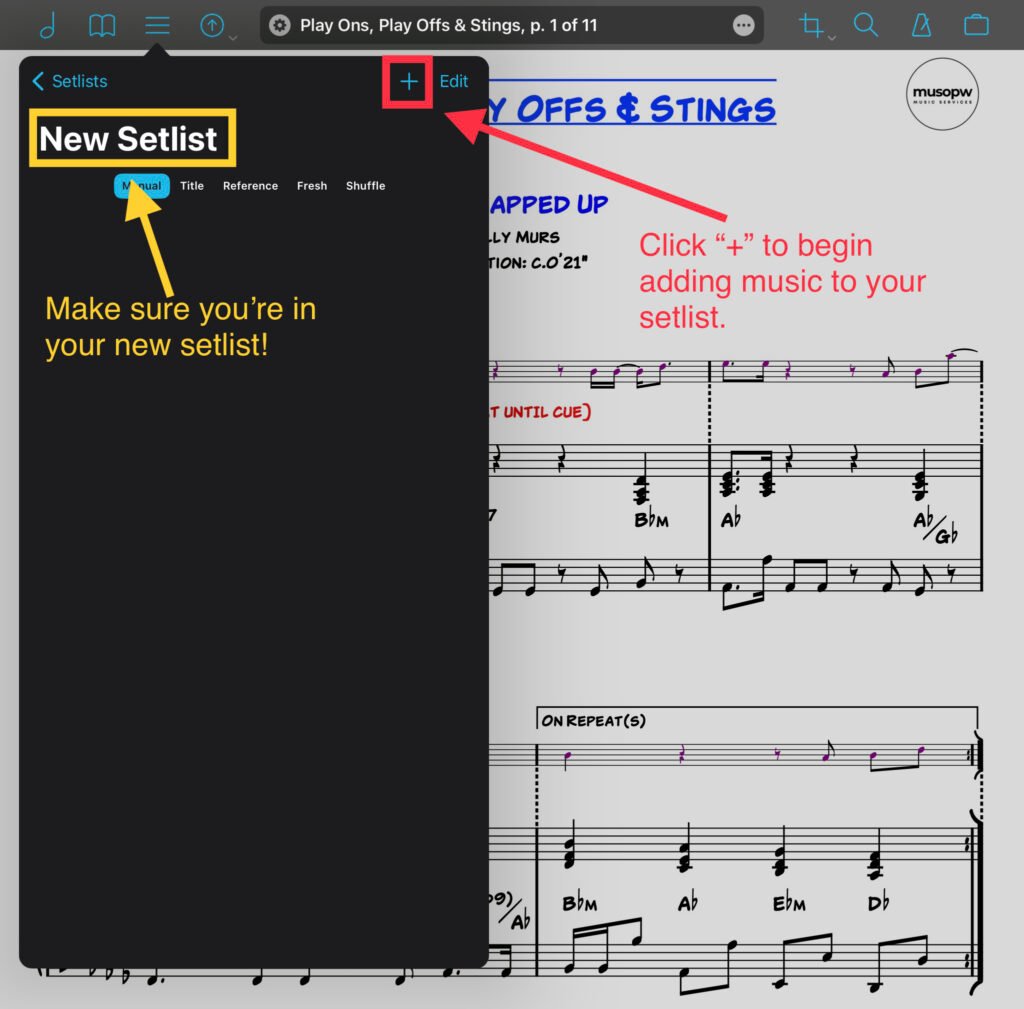
There is also a PDF score reader built into the app too which many would find useful especially if you are simply using it for reference. Fantastic for busker, rehearsed gigs etc. I personally still use forScore on another iPad to read from as the functionality of forScore is far more advanced that in Camelot Pro – simply an observation and not a criticism.

My Gear

iPad Pro  (11 inch, 128gb, Space Grey)

Hercules iPad Holder

Focusrite Scarlett 4i4

Yamaha MD-BT01 (Bluetooth Midi)

Roland RMIDI-B10-DUAL Midi Cables

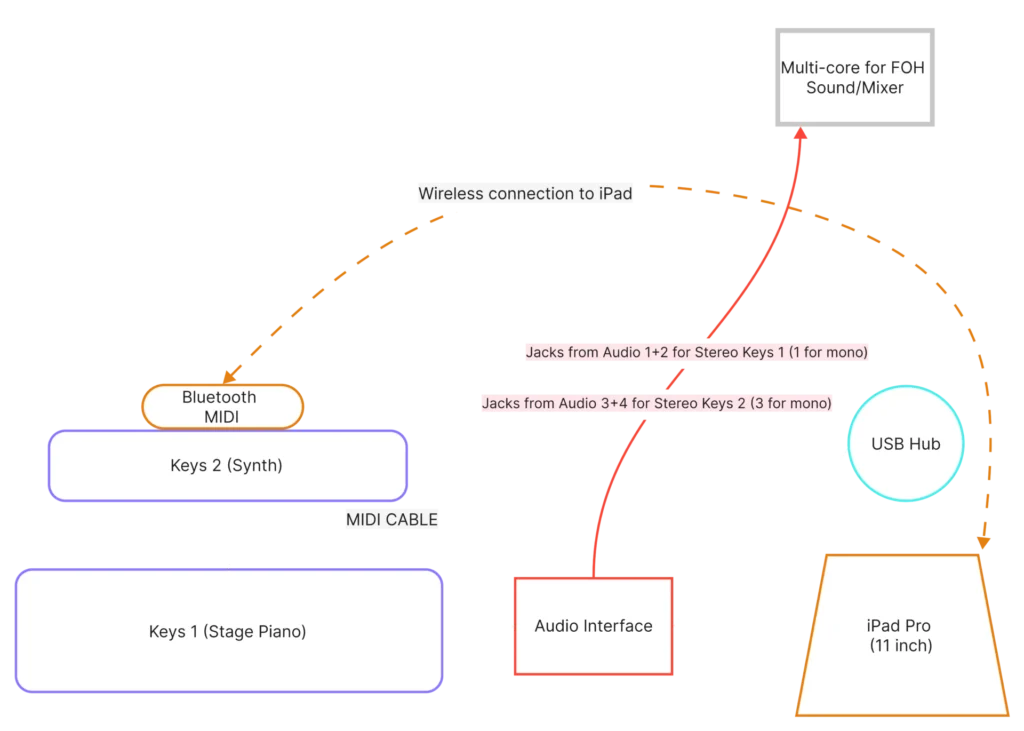
How is it connected?

Camelot Pro Connections for Dark Background New

Software/Apps

Camelot Pro (Camelot is a setlist manager, digital mixer, software instrument and effects host, PDF music score reader, multitrack audio player, and highly advanced MIDI patchbay and router.)

Korg Module Pro

With the following packs:

  • TRITON Best Selection $9.99
  • Wurley Electric Piano $4.99
  • Ivory Mobile Grand $14.99
  • Organ & Clav Collection $9.99
  • Module Performance Expansion $19.99
  • 80’s Electric Piano $9.99
  • Orchestral Dreams $9.99
  • Hybrid Synth Essential 2 $3.99

Bismark bs-16i

Pianoteq (by Modartt)


Want to see Camelot Pro in action?

Check out my recommended videos:

Exploring the functionality of Camelot Pro with the Creator.


Performance of Beat It (using plugins only) by Davide Puxeddu


How Beat It was created by Davide Puxeddu


Getting Started with Camelot Pro (Audio Modeling)


Piano & Orchestra with Camelot Pro (Audio Modeling)

forScore | Rearrange Function: 5 Ways to Empower Your Music Organisation and Performance

0

As a professional musician who uses the forScore app on a daily basis, the rearrange function is a bit of a hidden gem. Today, I’m going to tell you about how useful this function is.

So, let’s dive right in and explore the rearrange function in detail, shall we?

What Does the Rearrange Function Do?

The rearrange function is a simple yet powerful tool within the forScore app that allows you to organise and modify your sheet music files like a pro. With this function, you can:

  • Rearrange the order of pages by simply dragging them around.
  • Duplicate pages using the + icon.
  • Remove pages from the file.
  • Add existing files into the original file.
  • Add blank pages or blank manuscript pages into the file.
  • This content and video is not endorsed by forScore LLC. Find out more about forScore here: https://forscore.co/

    How the Rearrange Function Makes Life Easier for Musicians

    Now that we’ve gone through the basic functions of the rearrange feature, let’s talk about how it has made my life as a musician so much easier.

    Organising Sheet Music

    As a professional musician, I have a vast collection of sheet music files. With the rearrange function, I can easily organise my sheet music in any order I want. No more fumbling around with paper sheets or losing track of page numbers during a performance! Plus, it’s incredibly helpful when I need to find a specific piece of music in my extensive library. I can just rearrange my files in alphabetical order or by composer, making it much easier to locate the piece I need.

    Creating Custom Arrangements

    Sometimes, I need to create custom arrangements for specific performances or ensembles. With the ability to duplicate, remove, and add pages, the rearrange function has made this task a breeze. I can quickly create a new arrangement without having to start from scratch or manually copy and paste sections of the music. This is particularly helpful when I’m working on a project with multiple musicians, as it allows me to tailor the sheet music to each performer’s individual needs.

    Combining Multiple Files

    The ability to add existing files into the original file is a massive time-saver for me. It means I can quickly and easily merge multiple sheet music files into a single file, making it much easier to manage and navigate during performances. This is especially useful for musicians who play in different ensembles or perform in various genres, as they can merge all their sheet music into a single, comprehensive file.

    Adding Blank Pages or Manuscript Pages

    For those moments when I need to jot down some notes or create a quick sketch of a musical idea, the ability to add blank pages or manuscript pages is invaluable. It’s like having a digital notebook integrated into my sheet music library. This feature also comes in handy when I’m working on a composition or arranging project, as I can

    easily insert additional manuscript pages to write down new ideas, annotations, or modifications to the existing sheet music.

    Streamlining Rehearsals and Performances

    The rearrange function has also proven to be a huge asset during rehearsals and live performances. By creating customised sheet music files tailored to the specific needs of each performance or rehearsal, I can ensure that I have all the necessary pages in the correct order. This not only saves time but also minimises the chances of errors or confusion during the performance.

    Real-life Examples and Testimonials

    To give you a better idea of how the rearrange function can be utilised, here are some examples and testimonials from fellow musicians:

  • A pianist who regularly accompanies singers in recitals mentioned how the rearrange function has made it easy to adapt the sheet music to each singer’s preferred key, creating seamless transitions between pieces.
  • A conductor shared their experience of using the rearrange function to organise and customise scores for their orchestra, ensuring that each musician has the correct pages and cuts for their respective parts.
  • A music teacher praised the rearrange function for helping them create customised lesson plans and practice materials for their students, allowing them to focus on specific areas that need improvement.
  • Wrap Up

    In conclusion, the rearrange function in the forScore app has become an indispensable part of my daily routine as a professional musician. It has made organising and customising my sheet music files faster, easier, and more efficient. If you’re a musician who hasn’t explored this feature yet, I highly recommend giving it a try. It’ll change the way you work with sheet music forever!

    Check out my forScore page here.

    forScore | Quick Tip: Making Menus Full Screen for a Better Experience

    0

    As a musician who uses the forScore app daily, I’m always exploring ways to optimise my experience with the app. Here’s a quick tip on making menus in forScore full screen, which can be especially helpful for those who prefer a larger and clearer view of their options.

    forScore Pop over style original menu
    forScore Full Screen Menu Example

    Making Menus Full Screen in forScore 🖼️

    By default, the menus in forScore are displayed in a pop-over style, which can be convenient for quick access. However, for some users, having a full screen menu might be more preferable.

    To change your menus to full screen, simply follow these steps:

  • Tap the Settings icon (the “Briefcase”) in the forScore app.
  • Scroll down to the Accessibility section.
  • Toggle the Full Screen Menu option.
  • And that’s it! Your menus will now be displayed in full screen mode, giving you a larger view of your options.

    You can follow these visual guides to make this easier:

    forScore How Get Fullscreen Menus Step1

    forScore How Get Fullscreen Menus Step 2

    forScore How Get Fullscreen Menus Step3

    The Benefits of Using Full Screen Menus in forScore 🎯

  • Enhanced visibility: Full screen menus make it easier to read the options, especially for users with visual impairments or those using smaller devices.
  • Less clutter: With the full screen menu, the app’s interface becomes less cluttered, allowing you to focus on the task at hand.
  • Conclusion

    Switching to full screen menus in forScore can be a game changer for those who prefer a larger view of their options. It’s a simple tweak that can enhance your overall experience with the app. Give it a try and see if it works for you! 🎵

    ⭐ Check out forScore for yourself here.

    Find more forScore help here.

    forScore | Creating & Managing Setlists: A Musician’s Perspective

    0

    I often find myself preparing for performances with a predetermined programme of pieces, whether it’s for a concert, gig, or recital. The ability to create and manage setlists effectively is crucial to ensuring a smooth and seamless performance. That’s where forScore comes in, offering a robust and user-friendly platform to manage my sheet music and setlists with ease. In this blog post, I’ll share my experience with creating and managing setlists in forScore, helping you maximise the app’s potential for a stress-free performance experience.

    1. Creating a Setlist

    The first step in creating a setlist in forScore is to access the Setlists function. To do this, tap on the setlist icon located in the main app view. Once there, you’ll see a list of any existing setlists you’ve created, as well as the option to create a new one. Tap the ‘+’ button in the upper right corner to create a new setlist, then enter a title for your setlist and tap ‘Done.’ Your new setlist will now appear in the Setlists view, ready for you to add songs and customise as needed.

    Discover a quick tip on making menus full screen in the forScore app to enhance your experience. Learn the benfits of a full screen menus and how to enable them in just a few simple steps.

    forScore Creating A Setlist 2
    forScore Creating A Setlist 3

    2. Adding Songs to a Setlist

    Now that you’ve created a setlist, it’s time to add songs to it. To do this, open the setlist you wish to edit by tapping on its title. Within the setlist view, tap the ‘Edit’ button in the upper right corner, followed by the ‘+’ button. This will open your Library of sheet music, where you can browse and select the songs you’d like to add to your setlist. You can search for specific pieces using keywords, or filter your library by composer, genre, or other criteria. Once you’ve found the desired songs, tap on them to add them to your setlist. When you’re finished, tap ‘Done’ to return to the setlist view.

    forScore Creating A Setlist 4

    forScore Creating A Setlist 5

    3. Moving Songs Around a Setlist

    Sometimes, you may need to rearrange the order of songs within your setlist. forScore makes this process simple and intuitive. In the setlist view, tap ‘Edit’ in the upper right corner. You’ll notice that a ‘handle’ appears to the right of each song title (represented by three horizontal lines). To move a song, simply tap and hold the handle, then drag the song to the desired position within the setlist. When you’re satisfied with the order of your songs, tap ‘Done’ to save your changes.

    4. Working with Placeholders

    Placeholders are a useful feature in forScore that allow you to reserve a spot in your setlist for a piece of music that you haven’t yet added to your library. To create a placeholder, tap ‘Edit’ in the setlist view, followed by the ‘+’ button. Then, select ‘Add Placeholder’ from the options that appear. Enter a title for your placeholder, and tap ‘Done.’ Your placeholder will now appear in your setlist, serving as a reminder to add the desired sheet music later.

    5. Sharing Files

    forScore enables you to share individual files from your setlists with fellow musicians, making collaboration a breeze. To share a file, open the setlist containing the file you’d like to share. Then, tap the ‘Edit’ button, and select the file you wish to share by tapping on its title. Next, tap the ‘Share’ button (represented by a box with an arrow pointing up) and choose your preferred method of sharing, such as email or AirDrop. Your recipient will receive a copy of the file, which they can then import into their own forScore library.

    6. Sharing Setlists

    In addition to sharing individual files, forScore also allows you to share entire setlists with other musicians. This is particularly useful when coordinating performances with a group, as it ensures everyone has access to the same sheet music and programme order. To share a setlist, navigate to the Setlists view and tap the ‘Edit’ button in the upper right corner. Next, select the setlist you’d like to share by tapping on its title. Tap the ‘Share’ button, and choose your preferred method of sharing, such as email or AirDrop. Your recipient will receive the setlist, including all associated files, which they can then import into their forScore library.

    Conclusion

    forScore’s setlist management features provide musicians with a powerful and efficient means of organising their sheet music for performances. By mastering the process of creating, editing, and sharing setlists in forScore, you can ensure a smooth and stress-free experience both on and off the stage. Take advantage of forScore’s user-friendly interface and robust functionality to streamline your performance preparation and elevate your musical journey.

    This content and video is not endorsed by forScore LLC. Find out more about forScore here: https://forscore.co/

    Check out other forScore tips here.

    forScore | Main Functions Overview

    0

    forScore – Turbocharge your sheet music!

    As a experienced musician, I’ve had my fair share of experiences with sheet music. Gone are the days when we would fumble through piles of paper, desperately trying to find the right piece in the middle of a performance. With the advent of digital technology, managing sheet music has become a breeze, and forScore is undoubtedly the leader in this domain. As the first-to-market dedicated iPad music reading app, forScore has become the industry standard, with a robust and feature-rich interface that sets it apart from its competitors.

    In this blog post, we’ll explore the main functions of forScore, exploring the icons you see in the main app view and providing insight into their uses. So, without further ado, let’s dive in and discover how forScore can revolutionise your music management experience.

    1. Library

    At the heart of forScore lies the Library, which is your central hub for organising and accessing your sheet music. Tapping on the library icon will open a list of all your available scores, neatly sorted by composer, title, or genre. The search function also allows you to quickly locate specific pieces by entering keywords or using advanced search criteria, such as date added or last opened. You can also create folders to organise your music collection further, making it easier to locate your favourite pieces.

    forScore Library Icon 1

    2. Bookmarks

    There’s nothing more frustrating than needing to locate a specific passage or movement within a lengthy score during a rehearsal. With the Bookmarks function, forScore allows you to create custom markers within your sheet music, giving you instant access to the sections you need. Simply tap the bookmark icon to open the list of bookmarks for the current score, and then tap on the desired bookmark to navigate directly to the corresponding page. You can also edit and rearrange your bookmarks, ensuring that your most frequently accessed passages are always within reach.

    forScore Bookmark Library

    3. Setlists

    As a performing musician, you’ll often find yourself preparing for concerts or gigs with a predetermined programme of pieces. forScore’s Setlists function enables you to create custom playlists of your sheet music, so you can easily access and manage your music for each performance. Tap on the setlist icon to view your existing setlists or create a new one, and then simply add the desired scores from your library. You can also rearrange the order of pieces within a setlist, making it easy to adapt your programme as needed.

    forScore Setlist Icon

    4. Assignable Buttons

    One of the standout features of forScore is its Assignable Buttons function, which allows you to customise your on-screen controls for a more personalised user experience. By tapping on the gear icon and selecting ‘Buttons,’ you can access a menu of available actions, such as turning pages, navigating setlists, or opening specific tools. Once you’ve assigned your desired actions to the available buttons, you can easily access these functions during a performance, allowing you to focus on making music rather than fiddling with the interface.

    forScore Assignable Buttons Icons

    5. Main File (Meta) Data

    The Main File Data icon in forScore provides an overview of information related to your current score, such as title, composer, and page count. By tapping on this icon, you can also access the ‘Edit’ menu, which allows you to modify score details, add custom labels or tags, and even link audio files for playback alongside the sheet music. This feature is particularly useful for musicians who need to practise with backing tracks or accompaniments, as it ensures that your audio and visual materials are always synchronised.

    forScore Score Meta Data

    6. Metronome/Notes/Tuner

    forScore also comes equipped with a suite of handy practice tools, including a metronome, a notes function, and a tuner. The metronome helps you maintain a steady tempo during practice, with adjustable beats per minute and time signature settings. You can even enable a visual flash to complement the audio click, providing an additional layer of guidance as you work on your rhythm.

    The Notes function is an invaluable tool for annotating your sheet music, allowing you to jot down comments, reminders, or interpretive suggestions directly onto the score. With a range of colours and pen styles to choose from, you can personalise your annotations to suit your needs. Plus, these digital notes can be easily edited or removed, ensuring your sheet music remains clutter-free.

    Lastly, the built-in tuner is a godsend for musicians who need to ensure their instruments are in tune before a performance or practice session. Compatible with a range of instruments, the tuner provides real-time visual feedback on your pitch, enabling you to make adjustments as needed. With these integrated practice tools, forScore becomes more than just a sheet music app – it’s a comprehensive practice companion.

    forScore Metronome Tuner Selector

    7. Settings

    Customisation is a key aspect of forScore, and the Settings menu allows you to tailor the app to your preferences. By tapping on the gear icon, you can access a range of options, such as display settings, page-turning preferences, and performance mode features. You can even adjust the app’s appearance, choosing from various themes and background colours to create a comfortable and inspiring environment for your practice or performance.

    forScore Settings Icon

    Conclusion

    As an experienced musician, I can confidently say that forScore has revolutionised the way I manage, organise, and engage with my sheet music. With its feature-rich interface and customisation options, it caters to the unique needs of musicians across all genres and levels of expertise. By mastering the main functions outlined in this blog post, you too can harness the power of forScore to streamline your music management and elevate your practice and performance experience. So why wait? Give forScore a try today and discover the difference it can make in your musical journey.

    This content and video is not endorsed by forScore LLC. Find out more about forScore here: https://forscore.co/

    Check out other forScore guides and tips here.